Thursday, June 28, 2012

White Chocolate Cranberry Cookies

This weekend, the ladies on my dad’s side of the family are throwing an ‘O’Gara Women’s Weekend’ in Southern California.  Now, I’m not privy to their itinerary, but I can just imagine their weekend spent sipping mimosas in wide brimmed hats, telling family stories and laughing over happy memories.  If you’re reading from SoCal, don’t be surprised if you happen to see a caravan of hysterical and jubilant women marching across the beach searching for the perfect place in the sand.   That’s the better half of my family – you’d better watch out!  Outside of their whimsy, the O’Gara women are strong and confident, and incredible role models for us kids.  I’ve learned many a lesson on decorum, practicality and even cooking techniques from these impressive ladies.  I hope they’re having fun and I hope they enjoy these cookies I've sent.  


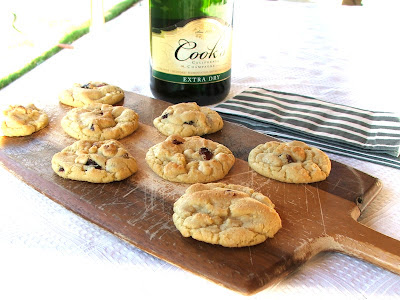
Today’s recipe is a perfect fit for a Women’s Weekend (despite the butter and sugar – but I swear, you can’t make these cookies without them).  These cookies are light and sweet, with pops of tartness from the cranberries and freshness from the orange.  I under-bake them just slightly so they’re chewy rather than crunchy.  They taste great with a glass of milk and better with Champagne. 


2 C. Flour
1 t. baking soda
1 t. salt
1 C. butter
1 C. sugar
1 t. vanilla
1/2 t. orange zest
2 eggs
8 oz. white chocolate chips
8 oz. dried cranberries
3 oz. walnuts (optional)

Preheat oven to 375 degrees.

In a small bowl, combine flour, baking soda & salt.  In a large bowl, cream butter and sugar.  Add one egg at a time and beat until well incorporated.  Add the vanilla and orange zest.  Mix again.  Gradually, add the dry ingredient mixture until dough forms.  Fold in white chocolate chips, dried cranberries and walnuts. 

Drop about 2 T. of dough onto an ungreased cookie sheet and bake for approximately 6-8 minutes or until the cookies are golden brown.  They will be moist and chewy.  Cook longer if desired.  Allow the cookies to rest for 2 minutes on the cookie sheet and then move them to a cooling rack.


Friday, June 22, 2012

Chicken Marsala Rotini

Now, I know what you must be thinking.  I thought these recipes were supposed to be approachable!  This one has a bunch of ingredients, fancy wine and two different kinds of mushrooms!  How can that be approachable?  Well, I will show you.  Don’t be intimidated – this recipe might take a few steps, but it’s completely do-able even for the novice chef.  It’s perfect for a special occasion or just an evening when you need a lil’ bit o’ comfort.  And it’s RULL good! 


I’m very proud of this recipe because it has such a perfect mix of elements and ingredients.  The onion provides a natural sweetness; the mushrooms give earthiness (and each kind of mushroom tastes different); the pasta adds some hearty love and the sauce brings it all together harmoniously.  Maybe it should be called ‘Sweet Earth Lovely Pasta Marsala!’

You’ll find this meal to be robust and tempting, and soon a forget-me-not in your recipe box.  Call me if you can resist a second bowl!  I’ll be impressed…and then I’ll eat your extra serving.

3 chicken breasts, sliced
1 pint button mushrooms
2 Portobello mushrooms
1 small onion
                                                                                                               
1 1/2 C. Chicken Stock or low sodium chicken broth
3/4 C. Marsala Wine (don’t let this scare you – it’s cheap and easy to find)
2-4 T. heavy cream

Water, to cook pasta
Rotini pasta
Parmesan cheese, for garnish

In a shallow dish, season the chicken with salt & pepper and drizzle with olive oil.  Allow the chicken to marinate for 20 minutes or more.  Slice onion and mushrooms and set aside. 

Heat a large skillet over medium-high heat, and cook chicken until golden brown.  Remove and set aside.  Allow to rest.  Add the onions to the pan and sauté until caramelized.  Remove and set them aside.  Add the mushrooms and a little extra olive oil and cook until they are browned.  Remove and set them aside. 

In a large pot, bring water to a boil and cook the pasta until al dente. 

Meanwhile, pour the chicken stock into the pan where you cooked the chicken, onion and mushroom and scrape the bottom of the pan to release all of the brown bits.  Bring the stock to a boil and reduce by half.  Add the Marsala wine and bring to a boil.  Reduce by half again.  The sauce may taste salty – don’t worry!  Once you add the ingredients back in, the flavors will level out. 

***’Reduce by half’ can be scary.  But, it’s not.  It just means cook it down until it’s about half of the amount you started with.  By doing this, you are really accentuating the flavors.

Add the heavy cream, one tablespoon at a time.  Whisk the sauce until it is well combined, light and creamy brown.  The sauce will be thin.  Add the chicken into the sauce and allow the chicken to reheat. Add the onion and mushrooms to the sauce as well.  Toss gently so everything is coated in the Marsala sauce.  Season with salt and pepper to taste, if needed.  If your skillet is big enough, add the pasta as well.  This way, all the ingredients begin to soak up the delicious sauce. 

Spoon the pasta, chicken and vegetables into bowls and top with Parmesan cheese. 


Sunday, June 17, 2012

Fizzy Piña Colada

This weekend, Sean and I reunited with my “work family” for a pool party in Gilbert, AZ.  We had a great time catching up on everything from new jobs and crazy coworkers, to summer vacations and baby stories.  We had delicious food – the biggest sandwich I’ve ever seen & my friend Lisa’s husband Darrin’s creamy guacamole.  I brought a drink that my dad taught me to make – and it was a HUGE hit!  I figured this was good timing, since today is father’s day. 


My dad’s been making this drink for 30 years and I know why.  I couldn’t even find a thing about it to change.  It’s perfect.  I just added some vibrant garnish for looks.  Thanks dad for this incredible summer staple and for always being my go-to guy for advice, help and a grounded, objective opinion.  Happy Father's Day!

This drink’s got the pineapple and coconut flavor that you expect from a Piña Colada, with a tart fizziness that everybody loves.  It is frothy and icy and temptingly refreshing.


1 12 oz. can of frozen lemonade concentrate
12 oz. pineapple juice
½ C. cream of coconut*
¼ C. clear rum (or to taste)
Lemon lime soda

Raspberries
Lemon wedges

*Cream of coconut can be found in the liquor section, although it’s not alcoholic

In a freezer-safe container, whisk together the frozen lemonade, cream of coconut, juice and rum.  Make sure these ingredients are well combined, without lumps, and place the container in the freezer for at least 12 hours.  It will form a sorbet-like mixture.  Don’t worry – it’s not supposed to harden completely, because of the rum. 

Drench a glass of ice with the lemon lime soda, leaving just a smidge of room at the top.  Scoop a healthy (read: extra large) spoonful of the sorbet into the soda and stir until it’s completely combined.  Complete this drink with a wedge of lemon, some raspberries and a place by the pool for an amazing tropical getaway in a glass. 


Saturday, June 9, 2012

Blackberry Caipirinha

I first tried this drink in Jyväskylä, Finland, with my friend Alla.  Funny, really, because it’s actually from Brazil.  I imagine it’s just as refreshing though, no matter where you are in the world. 


My visit to Finland seems like a lifetime ago now, and an entire world away.  Alla was gracious enough to invite me for a week to her land of the midnight sun.  And it truly was a midnight sun – I remember one night in particular, staggering out of a bar at 4 in the morning with the sun shining bright overhead – a confusing and unmistakably delightful memory.  

Alla introduced me to wonderful, foreign things like cucumber and Munster toasts, Finnish sauna, and her family’s summer cottage.   We had such a blast.  I wish I could do it all over again.  One of my favorite memories of Finland though, is how Alla tried to teach me to say “Hooray, Finland!” so that when my plane landed in Helsinki, I could shout it out.  Unfortunately, I couldn’t pronounce it correctly, and it came out “Whore!  Finland!”  My apologies to the shy, Finnish men and women on the plane.  Kiitos, Alla, for the unforgettable visit!  

 Alla and me outside of our apartments in Albi, France.

I’ve tried to order a Caipirinha many times in the U.S., but it’s hard to find.  So, I bought a bottle of Cachaça and made my own version.  A Caipirinha is normally made from lime, muddled with raw sugar and topped with rum.  My version adds some fizz and blackberries for color.  Try to find Ypioca rum – it’s the best.  


Cachaça Rum (Ypioca is best)
Lime
Sugar
Lemon lime soda
Blackberries

In a martini shaker, muddle together half of a lime with 1 T of sugar and 3 blackberries.  Add two measures of Cachaça and shake to combine.  Strain and pour into a glass of ice and top with lemon lime soda.  Garnish with a lime wedge.  

The view from Alla's summer cottage.

 Me, all ready for the wilderness outside Alla's summer cottage.

Tuesday, June 5, 2012

Peach & Raspberry Crostata


When I was little, my dad used to serve vanilla ice cream with a cold raspberry and peach sauce.  This is my take on such a simple, and yet explosive, flavor combination.  I had been thinking about this crostata for quite awhile and as soon as raspberries and peaches went on sale, I was ready to test my idea!  Perfect timing I guess, because I watched an episode of The Pioneer Woman the other day where Ree Drummond made a scrumptious looking piecrust.  So, I decided to adopt it for this recipe and it worked perfectly! 


I reckon you can make this recipe 2 ways:  (a) as a simple, rustic crostata OR (b) take it to the next level for a truly impressive tart.  The pictures shown here are a mix between the two.  If you want to take the simple route, just buy a premade piecrust, fold it up over the fruit and bake it.  If you’re feeling more daring, follow my entire recipe.  Stay tuned for a more refined version coming soon.  In any case, you’ll end up with a delicious combination of fresh flavors!

3 ripe peaches, sliced
1 Pint of Raspberries
Zest of 1 lemon
3 T. Sugar

Pie crust (I used Ree Drummond’s  ‘perfect pie crust’ recipe, with some minor changes, recipe follows)
Beaten egg, for glazing
Water
Sugar in the Raw, for garnish (optional)
Preserves, for garnish (optional)


In a medium bowl, mix together sliced peaches, raspberries, lemon zest and sugar.  Let the flavors marry in the refrigerator. 

Form the dough into 2 disks and set them in the refrigerator for about 20 minutes. 

Preheat the oven to 375. 

Roll the dough out until it’s about ¼” thick.  Lay it carefully on a greased cookie sheet.  Pile half of the peach and raspberry combination into the middle of the dough and fold up the edges.  Don’t worry – it’s supposed to look messy.  Repeat the process with the other half of the pie dough and the fruit mixture.  

In a small bowl, mix the beaten egg with just a bit of water to form a wash. 
Brush the top of the pie dough with the wash.  This will help it get perfectly golden brown.  Sprinkle some raw sugar around the top for extra sparkle and a touch of sweetness.  Bake for 30-35 minutes. 

If you want to go the extra mile, brush the fruit with a bit of fruit preserves like apricot or raspberry.  This will give the fruit a bit of shine, like they do in France.  But remember, it’s supposed to be rustic.  Serve with vanilla ice cream if you so desire. 


Ree Drummond’s Perfect Pie Crust

3 cups all-purpose flour, plus more for dusting
1 teaspoon salt
¼ C. Sugar
1 1/2 sticks cold butter
3/4 cup vegetable shortening
1 egg
5 tablespoons cold water

Combine the flour and salt in a large bowl. Add in the butter and shortening. Using a pastry cutter, gradually work the butter and shortening into the flour until the mixture resembles tiny pebbles. This step should take 3 or 4 minutes.

Lightly beat the egg with a fork, and then add it to the mixture. Next, add in the cold water. Stir the mixture together until it's just combined. Yield: dough for 2 crusts.

http://www.foodnetwork.com/recipes/ree-drummond/flat-apple-pie-with-perfect-pie-crust-recipe/index.html

Friday, June 1, 2012

Filo Cups with Goat Cheese, Honey & Black Pepper

Tonight, I’m showing a painting at the Art Institute’s Artisan Gallery in downtown Phoenix.  It’s been a VERY long time since I’ve shown my art anywhere, so I’m pretty excited!!  The painting is one I’ve been working on for over a year, so it’s about time that I finished it.  It is inspired by a beautiful friend of mine from Flagstaff: Katrina. 
 
To celebrate, I thought I’d post a special cocktail party appetizer that I think pairs perfectly with a night of galleries, artwork and creativity.  These "cups of gold" are some of the simplest things you can make, and some of the most sophisticated.  They are crunchy and creamy with a delicate combination of unique flavors. 


1/2 packet of filo dough, cut into 3” squares
Melted butter
Soft Goat Cheese
Honey of your choice (I like orange blossom)
Cracked Black Pepper, optional

Preheat the oven to 350 degrees. 

Place one layer of the filo dough in each depression of a mini muffin pan.  Brush each square with some of the melted butter.  Lay another piece of filo on top and repeat until you have at least 3 layers of filo brushed with melted butter (5 layers for regular sized muffin cups).  Next, scoop a half-tablespoon of goat cheese into each filo cup.  Freckle with less than a pinch of cracked black pepper.  Place the filo cups in the oven and bake until they are golden brown, about 6 minutes.  Lightly drizzle with honey*.

*If you drizzle the cups with honey before baking, it can interfere with how the filo crisps.

Feel free to fill the cups with an herbed goat cheese for even more flavor.


 ~ PAiNTiNG ~
En Attendant, acrylic & newspaper on canvas

Art Institute Artisan Gallery
610 E. Roosevelt, Unit 144
PHX