Thursday, August 28, 2014

Lamb Burgers over Hummus with Heirloom Tomato Salad

Sometimes, you just have to dig out that old cookbook that hides on your kitchen shelf and make a dish that may not be groundbreaking, but sure is delicious.  This one fits the bill.  These lamb burgers are adapted from a recipe in The Mediterranean Cookbook by Parragon Publishing, and are so simple, you can't help but make them effortlessly.  Christian and I made these gluten-free by substituting crushed corn chips instead of bread crumbs and by serving them on hummus instead of buns. Whether you're gluten free or gluten+, give these babies a try.  These lamb burgers are rich, savory and aromatic and are the perfect Mediterranean meal for a warm summer evening.  


Lamb Burgers over Hummus

1 lb. Ground Lamb
3/4 Onion, finely diced
1 Clove garlic, minced
1 Egg
1 T. Fresh Mint, finely chopped
1 T. Fresh Parsley, finely chopped
1/4 C. crushed corn chips (or bread crumbs for gluten+)
S&P
Olive Oil
Soft Goat Cheese
Hummus

Preheat the oven to broil (or turn the grill to high).

In a large bowl, combine the lamb, onion, garlic, egg, mint, parsley, corn chips, S&P.  Using your hands, mix the ingredients until thoroughly combined.

Form into equal sized patties, indenting the center of them slightly.

Drizzle the patties with olive oil and place on a baking sheet (or carefully onto your cleaned grill).  Cook about 5 minutes, flip and cook for another 4 minutes until browned and slightly crisp on the edges and cooked all the way through.  In the last few minutes of cooking, add a spoonful of goat cheese so that it begins to melt on top.

To serve, smear your favorite hummus on the plate, top with the burger and a sprinkle of parsley & mint.  Serve with Heirloom Tomato Salad (recipe follows) and naan.


Heirloom Tomato Salad

We found some fantastic heirloom tomatoes at the farmers market this weekend and decided to make an extremely simple salad with them to go along with our lamb burgers.  Fresh, cool and crisp, this salad is a perfect balance to any rich, hearty entree.


2 Heirloom Tomatoes, chopped
1/4 C. Kalamata Olives, pitted & halved
Parsley & Basil, ripped
Drizzle of Olive Oil
S&P

In a medium bowl, toss all the ingredients.  Yes, it's THAT easy.  


Saturday, July 26, 2014

Shooting StarMosa

I can't think of a better way to start the day than with a cold, frothy mimosa (preferably served in bed).  Lately, I've tried a few variations of mimosas and this is one that works perfectly for a sun-filled summer morning.  Christian turned me on to this version which is inspired by a fresh-squeezed, vitamin boosting juice served at Northstar Cafe in Columbus.  The Shooting StarMosa is a light, subtle and sparkling twist on the classic brunch boisson.


Shooting StarMosa

1 Part Orange Juice
2 Parts Carrot Juice
Topped off with Champaign

In a glass, mix the orange and carrot juices.  Top with Champaign and swirl to combine.


Tuesday, July 15, 2014

Chicken Panang

I'm a sucker for good Asian food.  Chinese, Japanese, Thai and everything in between.  I love it all.  A few years ago, I tried curry for the first time.  It was an acquired taste for me, but once I discovered Panang, I knew I'd hit a home run.  It's spicy, a little sweet, and luscious, with a peanut butter finish.  Great with any meat or veggie (or whatever the hell you have in the fridge), this is a must-keep recipe to add to your repertoire for those often craved exotic evenings.  


Panang Curry 

Chicken Boobs
2 T. Olive Oil
Salt & Pepper
3/4 Onion, diced
1 1/2 C. Carrots, chopped into small rings
1/2 Zucchini, chopped
3 T. Panang Curry (found in a pouch or a can in Asian grocery stores)
1 Heaping T. of Peanut Butter
1 14 oz. can of Lite Coconut Milk
1 T. Fish Sauce
1 T. Brown Sugar
Basil, nuts and lime juice, to garnish

Sprinkle your chicken with salt & pepper.

Heat the olive oil in a non-stick skillet over medium heat until it glistens.  Add the chicken and cook for 4 minutes per side or until you get a nice, golden brown edge.  Make sure the chicken is cooked through.  Remove from the skillet and set aside.  When the chicken has had a chance to rest for 5 minutes, slice into pieces about 1" thick.

Add the onions to the skillet.  Cook until they are soft but not browned, about 6 minutes.  Add the carrots and zucchini and cook for another 3 minutes.  Stir in the panang curry and peanut butter, allowing it to coat the veggies.  Pour in the coconut milk and stir to thoroughly combine.  Stir in the fish sauce and sugar.  Taste and add more sugar, peanut butter or fish sauce as needed.  Add the chicken back and stir gently to cover it in the sauce.

Serve over rice and garnish with fresh basil, nuts of your choice and a squeeze of fresh lime juice.


Wednesday, July 9, 2014

Shish Kebabs

There is not much in this world as satisfying as grilling meat on a stick over flames.  Maybe it's my id, a yearning for simpler times, or gee whiz, maybe it's that fahwesome taste of char and caramelized sugars all over my food that only fire can lend.   In any case, I encourage you to unleash your inner cave man, break out the grill and start cooking like summer intended.  This weekend, my new obsession Christian and I grilled some shish kebabs using my dad's infamous recipe.  These shish kebabs are tender, juicy & fresh, and packed with sweet, teriyaki flavors.  


Shish Kebabs

1/2 lb. of Beef Tips (or your favorite protein), cut in large chunks
Salt & Pepper
Olive Oil
1 Red Pepper, cut in large chunks
1 Pint of Button Mushrooms, with stems on
1 Onion, cut in large chunks
1 Can of Whole Potatoes
1/2 C. Teriyaki Sauce (we used San-J gluten-free)
1 C. Pineapple, cut in large chunks (optional)
Wooden Skewers, soaked in water

Preheat your grill to nice and hot.  Season the beef with salt & pepper.  

Start to assemble the kebabs by starting with a piece of red pepper or onion.  This will secure the pieces so they don't slide off the end of the skewer.  Continue by adding the other ingredients.  Finish the skewer with another red pepper or onion chunk and set the kebabs in a shallow baking dish.  Repeat this until you've used all the ingredients.  

Drizzle your teriyaki sauce over the kebabs, making sure that each piece gets nicely coated.  Drizzle with a smidge of olive oil.  This helps prevent sticking on the grill and helps your food to get an extra crunch.  

When the grill is hot, carefully add the kebabs, perpendicular to the metal grates.  Cook for 5-6 minutes, until you get a good char.  Turn and cook for another 5 minutes on the other side.  Make sure your meat is cooked to a safe temperature.  Remove from the grill.  Drizzle with fresh sauce if you desire (NOT the sauce that collected at the bottom of your baking dish).   Serve with quinoa, couscous and something green.  


Thursday, May 29, 2014

Patio Weather

When I moved to Ohio, some friends told me that I had just missed "patio weather" and that I would not find anything better in this new state.  I nodded and smiled politely, all the while thinking how sitting on my patio sounded like a true bore.  Well, I don't think I've ever eaten my words (or thoughts) any faster than when patio weather did come around again.  It is now absolutely my favorite part of Ohio's spring and summers.  There's something so peaceful and satisfying about being outside on a beautiful patio eating good food, drinking cool drinks and enjoying the company of close friends.  The following recipes are inspired by good friends and fabulous patio weather.


Grilled Crostini with Dara's Hip Hoppin' Morockin' Carrot Dip  

My friend Dara Schwartz recently launched a line of all-natural dips made from local Ohio ingredients that are unbelievably flavorful and healthy.  My favorite is the Hip-Hoppin' Morockin' Carrot - Moroccan Carrot Dip.  It's spicy and exotic with a hint of raw honey.  Dara shared this appetizer recipe with me to enjoy the dip.  Try it tonight - you'll be blown away by the rocking' combo of flavors and textures.  


Hip Hoppin' Morockin' Carrot - Moroccan Carrot Dip
Baguette
White cheddar cheese, in thin slices

Preheat your grill to medium high.  Thinly slice your baguette on a bias (diagonal).  Grill them to your desired level of crunch.  I like mine burned and crispy.  In the last 2 minutes of crisping, add a slice of cheese and let it melt a bit.  Remove from the heat and top with a spoonful of carrot dip.  Garnish with something green and enjoy.  

Check out Dara's site @ www.daristacafe.com


Grilled Salmon with Dijon Maple Hollandaise and Pistachios

I've been on a huge salmon kick lately.  I love the crispy skin and the rich flavor packed into this hearty, but light, pink fish.  I've been experimenting with some different flavor profiles and this is one of the winners.  The salmon is grilled simply but adorned with some delicious, well-balanced accoutrements.  


Salmon fillets, skin on
Olive Oil
Salt & Pepper
1 Packet Hollandaise Sauce Mix
1 C. Milk
1/2 Stick of butter, melted
2 T. Dijon mustard
2 T. Maple syrup
Pistachios, roughly chopped

Preheat your well-cleaned grill to medium high.  Drizzle your salmon with olive oil and sprinkle with salt & pepper.  Let sit for 5 minutes at room temperature.  

In a small grill-safe saucepan, whisk together the Hollandaise mix, milk, butter, mustard and syrup.  Set the saucepan on the grill and stirring constantly, bring the mixture to a boil.  Move the saucepan to the corner of your grill, so it's not over the highest heat.  Keep and eye on it and stir frequently.  

Carefully place your salmon on the grill, skin side down.  If you're worried about it sticking, place a piece of aluminum foil on the rack and place the salmon on top.  Close the grill and let the salmon cook for about 5-6 minutes.  Don't touch it - you want the skin to be nice and browned.  When the skin is looking crispy, carefully flip it and brown the other side for another 4-5 minutes.  Technically, salmon is supposed to be cooked to an internal temperature of 145.  I take mine off a few minutes before this and cover it with foil because it will continue cooking for a short while once off the grill.  

To plate, spoon the Dijon Maple Hollandaise onto the plate in a swirl.  Add the grilled salmon on top and sprinkle with chopped pistachios.  

Happy Patio Weather!


Tuesday, April 29, 2014

Smoked Salmon on Cheddar Waffles with Dill Sour Cream

Smoked salmon is one of those ingredients that just doesn't get enough face time.  You probably walk by it in the grocery store every weekend and yet, how many times have you actually bought it?  I'm guessing not many.  Give it a try - it's salty, rich and good for you!  And I've got a great introductory recipe for you. These smoked salmon triangles combine several delicious components - a crunchy savory waffle, fresh dill sour cream and smoky salmon - a combination that's as satisfying as it is fancy.

I visited PHX last weekend and made these for my mom's UNO party.  T'was a great, unique hit.  Thanks, ladies, for being so adventurous!


Smoked Salmon on Cheddar Waffles with Dill Sour Cream

1 package smoked salmon
Cheddar Waffles, recipe follows
Dill Sour Cream, recipe follows
Fresh dill

Cut your waffles into triangles.  Add a teaspoon of dill sour cream on each.  Top with a small slice of smoked salmon and garnish with fresh dill.  

Cheddar Waffles

2 C. Baking Mix
1 3/4 C. Milk
3/4 C. Shredded cheddar cheese
2 Eggs
2 T. Melted butter
1/2 t. salt
1/2 t. pepper
Non-stick baking spray

Preheat your waffle iron.  

Combine all ingredients except baking spray in a large bowl.  Mix until smooth.  Spray the waffle iron with non-stick baking spray.  Follow the waffle iron's instructions to bake your waffles.  You want them slightly more crunchy than a traditional breakfast waffle.  The cheese will help you with this.  

Dill Sour Cream

1 C. Sour Cream
4 T. fresh dill, chopped
1 T. Mayonnaise (optional)
Squeeze of lemon juice
Pince of Salt & Pepper

In a small bowl, combine all the ingredients.  Place in the fridge for a couple hours so those flavors can marry.  


Friday, April 18, 2014

Empanadas

I've been on a huge latin food kick lately.  I just can't get enough tacos, quesadillas, fajitas, patacones, chimichurri, empanadas...and the list goes on.  Since I'm still searching for that perfect hole-in-the-wall Mexican restaurant here in Columbus that serves all of the above, I've been trying my hand at some of my favorite dishes in my own kitchen. Empanadas are definitely at the top of the list and what do you know, they're easy enough to make at home.  I first tried empanadas in Barcelona, near La Segrada Familia and I fell in love with their buttery, flaky crust and the powerhouse flavor packed inside.  My empanadas are dynamic, smoky and indulgent and repackaged a croissant-like crust.  They are best served hot, right out of the oven, but taste great at room temperature as well.  They can even be made in advance, frozen and cooked later on.  You gotta try these!

This recipe has many steps, but don't be intimidated.  They're all easy and the result is worth it.   

Empanadas Perfecto 
This recipe makes 8 empanadas.

For the marinade:
Zest and juice of 1 orange
Juice of 1 lime
2 garlic cloves
1 t. Cumin
1 t. Smoked Paprika
1 Chipotle Pepper in Adobo sauce (more if you like it spicy)
1 T. Cilantro
1/4 C. Oil
Salt & Pepper 

For the filling:
Flank Steak, cut into small cubes
1 Onion, diced
1 Red Pepper, diced

For the crust:
Puff Pastry (2 sheets)
1 Egg, beaten
Avocado, tomato & cilantro, for garnish

In a blender, pulse the citrus juice, garlic, spices, chipotle, cilantro, oil and salt & pepper.  Your mixture should be thin and a bright orange color.

Carefully pour this marinade into a big resealable bag.  Add the cubed steak and allow it to sit in the fridge for a couple of hours, or at least for 30 minutes.

Heat a couple Tablespoons of olive oil in a medium skillet.  When it's hot, add the onions and peppers.  Cook over medium until they have caramelized.  When they are dark and golden, remove them from the skillet and set aside to cool.  Don't skimp on their cooking time - they're going to add great flavor to the empanadas.

Remove your puff pastry from the freezer and allow it to thaw.  Preheat the oven to 400.

Reheat that same skillet over medium heat.  Add your steak with the marinade and cook over medium heat until the steak is cooked through, about 10-12 minutes.  When the meat is thoroughly cooked, but not overdone, remove the skillet from the heat.  Allow to cool slightly.

Open your puff pastry and lay it flat on a baking sheet sprayed with cooking spray.  Working quickly, cut the puff pastry sheet into 4 equal squares.  To each square, add about 2 Tablespoons bit of the steak and onion mixture.  Brush the left side and bottom side of each square with a bit of beaten egg so the pastry seals when it's folded.  Take the top right corner of each square and fold it over to the bottom left corner.  Use a fork to crimp the edges, sealing in that great flavor.  Slice an X on the top so the steam can escape and brush the entire triangle with beaten egg.

Pop them in the oven for about 12 minutes or until the pastry is golden brown.  Serve with fresh avocado, tomato and cilantro.


If you find that you have leftover filling, use it in some tortillas or simply with an egg on top.  


Wednesday, April 9, 2014

Baby Greens Salad with Accoutrements

From time to time, my body just craves something light and healthy.  I don't know if it's the yoga I've started doing or the warmer, longer days, but this weekend was a good time to eat light.  And this salad hit the spot.  I've said it before, but salads can be really good or really boring.  I like to experiment with different fruit and veggies, nuts and cheeses in my salads - there are many winning combinations.  This salad is sweet and tropical with golden brown chicken and a satisfying crunch.  


Baby Greens Salad with Accoutrements

Baby Greens
Chicken, sliced (grilled, pan-fried or rotisserie)
Gorgonzola Cheese
Strawberries, sliced
Mandarin Orange wedges
Nuts (almonds, pistachios or pecans)
Champaign Vinaigrette (or your favorite dressing)
Salt & Pepper

In an extra large bowl, toss the mixed greens in a couple tablespoons of the salad's dressing.  Sprinkle with salt and pepper to taste.  (This is how they do it in a restaurant; so the salad is completely coated, but not soggy).  

Transfer the greens to a plate and top with the chicken, cheese, fruit and nuts.  Top with more dressing and salt & pepper.  


Tuesday, March 18, 2014

Kung Pao Bánh Mì

Not too long ago, a thought occurred to me while I was eating cold, leftover Kung Pao Chicken for breakfast.  Yes, breakfast.  (You know you've done it too).  The flavors were still great but it wasn't substantial enough for a meal since the rice had dried out.  So, I spooned it onto a baguette, topped it with some mayo, cilantro and cucumber et voila!  A homemade version of Vietnamese Bánh Mì without all the daunting hassle of the original.  This Kung Pao Bánh Mì has all the flavor of the classic Chinese take out dish, but it's served anew on a crunchy light fresh delectable vessel. 

*Bánh Mì means baguette and was introduced to the Vietnamese culture by the French during its Colonial Period.  

Kung Pao Bánh Mì 
1 Mini baguette, sliced laterally
3/4 C. Leftover Kung Pao Chicken
Mayonnaise
Cilantro, chopped
Cucumber ribbons
Salt & Pepper

Preheat the oven to 350.  

Spread a thin layer of mayonnaise on both sides of your baguette. Spoon the Kung Pao Chicken onto the bread.  Pop the open-faced sandwich onto a baking sheet and into the oven.  Allow it to just warm through, about 8 minutes.  Remove from the oven and top with cold cucumber ribbons and fresh cilantro.  Sprinkle with salt and pepper to finish.  Place the top of the baguette on the laden bottom slice and enjoy!  


Thursday, February 6, 2014

Apricot BBQ Meatballs with Basil & Peanuts

Sometimes, one recipe's just not enough.  Awhile back, I learned about Grape Jelly Meatballs, the best and easiest meatballs you'll ever make.  After making them a hundred times over the past 2 years, I decided I was ready to switch up the recipe.  This is a take off of that recipe, with a few new flavors added to the mix.  These meatballs are sweet and robust, with a hint of asian flare.  They are splendid as a party food or appetizer or as a main course served with rice and veggies.  


Apricot BBQ Meatballs with Basil & Peanuts
1 C. of Apricot jelly
1 Small can of crushed pineapple
1 C. of BBQ sauce
1 Pinch of red chile flakes
1 Bag of traditional frozen meatballs (not italian flavored) 
Basil, sliced thinly 
Peanuts

Turn your crockpot to low heat.  Add the apricot jelly, pineapple BBQ sauce and chile flakes.  Stir to thoroughly combine.  Add the meatballs and gently toss to coat them in the sauce.  Cook on low heat until they are cooked through, up to 8 hours.  Toss them a couple times so the meatballs soak up all that great flavor.  To garnish sprinkle with basil and peanuts.  

*You could use this sauce as a mild, sweet version of General Tso's chicken, especially for kids.


Friday, January 31, 2014

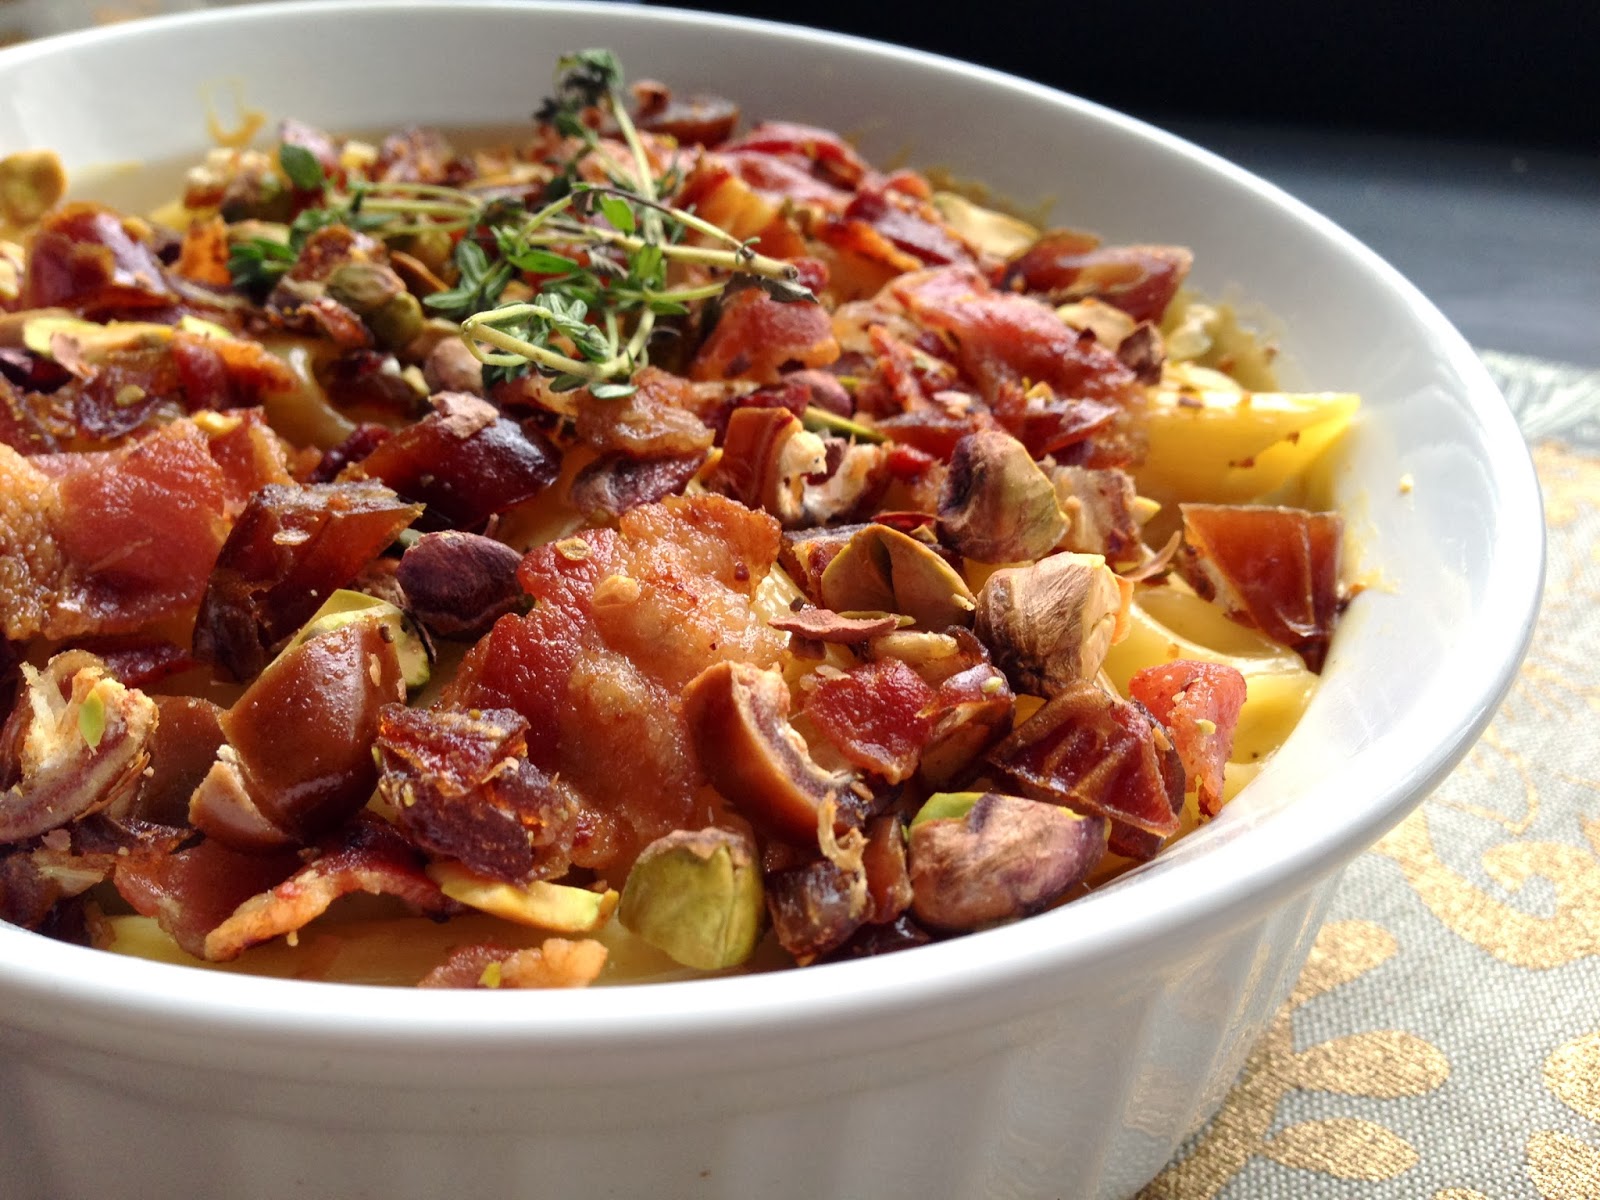
Bacon, Date & Pistachio Encrusted Mac & Cheese

An accidental success gave birth to this unusual recipe.  My roommates and I threw a party where we served homemade macaroni & cheese and bacon-wrapped dates, alongside many other finger foods.  The next day, I heated up some leftover mac n' cheese and, as happens from time to time, it got mixed into the candied dates.  Naturally, I just ate them all together.  BOOM!  A creamy, luscious, taste-bud popping classic was born.


This twist on your everyday mac n' cheese replaces the quotidien bread crumb topping with a mixture of smoky bacon, sweet dates and salty pistachios.  Elevate your next bowl of mac n' cheese with these decadent ingredients for a TO.DIE.FOR comfort meal.


Bacon, Date & Pistachio Encrusted Macaroni & Cheese

Your Favorite Macaroni/Pasta & Cheese
5 Slices of Bacon, cooked
5-6 Pitted Dates
1/4 C. Pistachios, shelled (almonds would also work well)
Something green for garnish, like thyme

Preheat the oven to 350.

Place your cheesy pasta into a greased baking dish.  Set aside.

Roughly chop your bacon, dates & pistachios into similar sized pieces.  Mix them together in a small bowl.  Evenly cover the pasta with the bacon mixture.  Bake for about 15 minutes until the pasta is heated through and the topping has ever so slightly browned.  Garnish with thyme to finish.


Thursday, January 23, 2014

Beet Salad with Goat Cheese & Pistachios

My friend Mike says beets taste like dirt.  To him, this is a positive thing. To me, well, dirt's not my favorite flavor.  I've never been a beet lover but last week on a business trip to Scottsdale, AZ., my mind was changed.  I tried the most delicious version of beets that I've ever had. This recipe is my humble recreation.  Crunchy, creamy and fresh, these beets make the perfect side dish to any meal.  Serve them warm in the winter or cold in the summer.  

Beets are a great source of potassium, fiber and vitamin C.  

6-8 Beets, tops and roots removed, peeled and chopped (or 2 cans of beets, chopped and drained)
2 T. Olive oil
Salt & Pepper
1/4 C. Pistachios, shelled
1/4 C. Raisins
4 oz. Creamy goat cheese
4 Sprigs of thyme

Preheat the oven to 400 degrees.  

In a large bowl, toss the beets, olive oil, salt & pepper.  Spread out on a large baking sheet.  Roast in the oven for about 25-30 minutes, or until the beets are fork-tender.  Remove from the oven and allow to cool slightly.  *If you use canned beets, roasting is not necessary, but will add some more dimension to your dish.  

This salad tastes great hot or cold, so when you're ready to serve, transfer the beets to a serving dish.  Sprinkle with pistachios and raisins.  Crumble the goat cheese over the top and garnish with thyme leaves.